The Hort Report: Use the open center form to prune peach, cherry trees

The weather has been above normal for temperature and below normal for moisture, so enjoy the warmer weather we are having.
Spring is coming soon. We may have a few cold days and nights ahead, so you should still do your spring pruning of your fruit trees. However, I have seen many large groups of geese flying west to northwest in the past few days, along with some robins and even small flying insects.
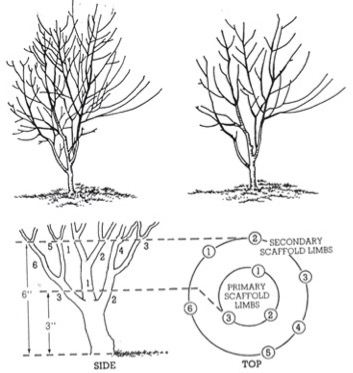
I want to discuss the open center form of pruning peach and cherry trees. With this type of pruning, make sure the center of the fruit tree is open so plenty of air can move in and around all the new blooms on the trees.
Like pruning an apple tree using the central leader pruning system, I’m aiming for maximum fruit production each time I prune. Remember to prune slowly and take your time. Once you cut any branch or limb, it won’t be growing back very soon.
Stand back and see where all the problem branches and limbs are on your fruit tree. Make sure to leave the middle as open as possible. Start at the bottom and work your way up pruning your fruit tree.
Branches and limbs that are broken, damaged and diseased should be pruned first. Make sure to get any branches and limbs that may cross over each other, causing problems in coming years. Look for any crown or sucker roots coming up from the ground.
I then prune any limbs and branches I might hit while mowing around the fruit trees. Once this is done, I will stand back and look to see how the fruit tree is being shaped from past years of pruning. I will continue to prune with the idea to having an open center, making sure I have a clear path to pick all the fruit I can.
I will stand under the tree and look from the trunk outwards to the new growth at the ends of the limbs and branches. I then start pruning in a circle from the inside out to get the most production a fruit tree can produce.
I recently wrote about how to grow early cool-season vegetables. You can also be raising cool-season vegetables in raised beds and large empty mineral tubs.
Laura and I have been using raised beds and containers for the past several years in growing vegetables. But just like growing vegetables in the garden soil, if the soil in the raised beds and containers isn’t very good, you will have a hard time raising good vegetables.
Put a thick layer of cardboard in the bottom of a raised bed. Add several inches of old limbs and branches to take up room in the bottom.
Add in several inches of old hay, straw or other types of dry types of organic matter that will decompose slowly. Add in 6-month-old or older dry manure. This mix will be within four inches of the top of the raised bed. Add in potting soil, Garden Magic and garden soil to build up a soil mix for growing vegetables.
When using large empty mineral tubs to grow vegetables in, drill holes in the bottom of the tubs so water can drain out of them. Add small sticks to the bottom of the tub, then cardboard, dry organic matter and manure, potting soil, Garden Magic and garden soil.
I appreciate all your questions in the past and look forward to them in the future. Call me at 573-588-2040 or visit me at Shelby County Implement. Email me at sci63468@hotmail.com. I really enjoy visiting with you anytime I can.

Pat Greenwell is the owner of Shelby County Implement in Shelbina, Mo. He was a high school agriculture teacher for 11 years. He has taught adult vocational agriculture since 1987. He also is a research assistant at the Truman State University Ag Department Farm.
Miss Clipping Out Stories to Save for Later?
Click the Purchase Story button below to order a print of this story. We will print it for you on matte photo paper to keep forever.

